Please note: This guide only applies to websites that have our file listing module installed. If you don’t have this module installed, you can follow a separate guide to create simple links to your files, or ask us to install this module on your website.


Our file listing module allows you to display a nice-looking table of files, which visitors can click on and download. We can customise the colours to match your website’s branding, with a couple of examples shown above.
The table normally shows:
- An icon for the file type (for example, a PDF is displayed above).
- The title of the file.
- The date it was uploaded to your website.
- The size of the file.
To add files to your page:
- Firstly, rename the file(s) on your computer exactly as you’d like them displayed on your website:

- Go into your website editor and open the relevant page in your “Pages” menu.
- On the page, as long as we set it up for you, there should already be a command code. This tells the website where to display your file listing. You do not need to touch this code.
 If you’re setting up the file list on a brand new page, we recommend finding an existing file list code on your website (that we’ve already setup for you) and copying and pasting this into your new page.
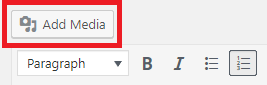
 - Click on “Add Media“:
 If you don’t see this button, and you’re using the page builder system, click on the “Classic Mode” button first:

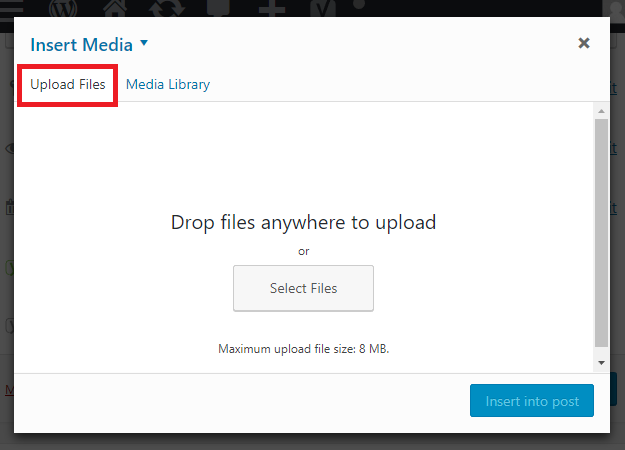
- Ensure the “Upload Files” tab is displayed, then either drag and drop your file(s) into the screen, or click the “Select Files” button. You can select and upload multiple files in one go. Note there is also a maximum upload size too:
- Wait for the file(s) to upload:

- If you need to edit any of the titles, click onto a file, then you can change the wording in the “Title” box on the right-hand side of the screen. Any changes you make to the title will automatically be saved:

- Next, very importantly, PLEASE DO NOT click the blue “Insert into post” button. (This will insert your file as a simple text link). Instead, just close the dialogue by clicking the “x” at the top right of the screen, indicated here in green:

- Only if you clicked “Classic Mode” in step #4, now click on “Backend Editor”, and the page builder system will return.

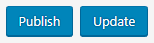
- Save your page by clicking the “Publish” or “Update” button:
- Your file listings should now be displayed on the front-end of your website, styled into a neat grid:

To remove a file from your table:
- Go to the relevant page in your “Pages” menu.
- Click on “Add Media“:If you don’t see this button, and you’re using the page builder system, click on the “Classic Mode” button first:
- Choose the “Media Library” tab and select “Uploaded to this page” from the drop-down menu. This will display files associated with this page, to make it easier to find your file(s):

- Select the file you want to delete, then on the right-hand side, click on “Delete Permanently“:

- Click “ok” to the confirmation prompt.
- Once you have deleted your files, simply click the “x” at the top of the screen. PLEASE DO NOT click the blue “Insert into post” button:
- Only if you clicked “Classic Mode” in step #2, now click on “Backend Editor”, and the page builder system will return.
- Save your page by clicking the “Publish” or “Update” button:
- Your file listing has now been updated.
Separating your files into different blocks or categories:
Sometimes you need your files separated into sections, such as the example below:
 You can do this with the tag system. We recommend you ask Primary Image to set this up for you.
Each file block will have a unique tag. Below, for example, the tag is “logos“:
![]()
When uploading each file, use the “Media categories” box (on the right-hand side of the screen) and type in this same tag, e.g. “logos“.

The file block will then only display files that have been given the associated tag.
How do I convert an existing file list into categories?
This assumes you are replacing an existing (single) file list, with a series of categorised file lists.
- Ensure the new categories and codes are already setup on your page (see above). If you have asked Primary Image, we will set this up for you.
- Click on “Add Media” at the top of the page:
- Choose the “Media Library” tab and select “Uploaded to this page” from the drop-down menu. This will display files associated with this page, to make it easier to find your file(s):
- Click on the file you want to categorise.
- Use the “Media categories” box (on the right-hand side of the screen) and type in the tag that matches the code in Step #1 (or, if Primary Image has set this up for you, we will advise you of the codes to use):
- Repeat Steps #4 and #5 for as many files as needed.
- Once you have categorised your files, simply click the “x” at the top of the screen. Do not click the blue “Insert into post” button:
- You can remove the old file listing block, by deleting the code on your page, or you can ask Primary Image to do this for you.
- Save your page by clicking the “Publish” or “Update” button:
- Your file listing has now been updated.
Adding externally-hosted files:
If you want to add externally-hosted files to your file tables, e.g. from Google Drive, then we can setup a new file table in your website.
Once we have set this up for you, please follow these steps:
- Go to “File List Pro“.
- Click on “Add New“.
- Enter the title of your file, as you want it displayed within your file table (e.g. “Annual Report”).
- Enter the URL of your file (e.g. https://drive.google.com/file/your-link).
- In the “File size” box, add the file size (e.g. 1 MB). This will be displayed in your table.
- Choose the “File type“, which will display an icon within the file table (e.g. “doc” for document).
- Enter the “Date created/updated” using the format MM/DD/YYYY.
- Next, in the “Media Categories” box, on the right-hand side of the screen, start typing the “tag” that we have given to you. Once you have typed the first few letters, you should be able to click on the tag to select it.
- Click “Create link“.
- The file should now be displaying in your file listing.
Change the format of your file table:
Advanced users only
Please note, you do not normally need to touch these settings.
If you wish to change the display of your table, here’s what the code means:
- type = The file extensions that are displayed, normally PDF and DOC (Word) files.
- thispostonly = Displays files uploaded to this page, as opposed to from the whole website. This shouldn’t be changed.
- orderby = This changes the sorting of the files. Normally files are sorted by “title”, but can be by “date” if you wish instead.
- orderdir = This changes the sorting direction of the files, either “ASC” for ascending, or “DESC” for descending.
- filesperpage = This controls how many files are displayed at the same time. You can set this quite high. If you have more files than this number, “Next” / “Prev” buttons will display.
- hidesearch / hidesort / hidefilter = By default we normally hide these extra features (as it may overwhelm visitors with too many options), but change these settings to “false” and it’ll display a search box, sort button and file type filter:

Security considerations for private / members’ only webpages:
Please note: This section only applies to websites with private / members’-only pages.
Please note that all files uploaded to your website via this module are normally publicly accessible, regardless of whether the page itself has restricted access.
So, for example, if you have a members’ only area on your website (e.g. www.yourwebsite.com/members-page), people will only be able to see the page and file listings table if they have permission (i.e. the correct login details) to read the page.
But, should someone try to access one of your file URLs directly (e.g. www.yourwebsite.com/files/staff-manual.pdf), anyone will be able to download the file, because only the webpage is read-protected, not the file itself.
It means it’s theoretically possible (although unlikely) that unauthorised users could view the files you’ve uploaded to your website. For example, if one of your staff shared a direct URL to one of the files with other people, anyone with the file link will be able to open and download that particular file, regardless of whether they have permission to see the file listings table. It also means that somebody could try to guess the URLs of your private files, although this scenario is highly unlikely.
For this reason, we do not recommend using this module for storing sensitive or confidential files, without prior discussion with Primary Image first. We can setup additional security measures or install different file listing modules if required, where files can only be accessed by logged-in users and file links cannot be shared.
If you have any specific security requirements, or need any further help with this file listing module, please contact us and we’ll be happy to help.